Privacy Policy popup
×Privacy Policy popup
×
 5,668
5,668  15 Minutes
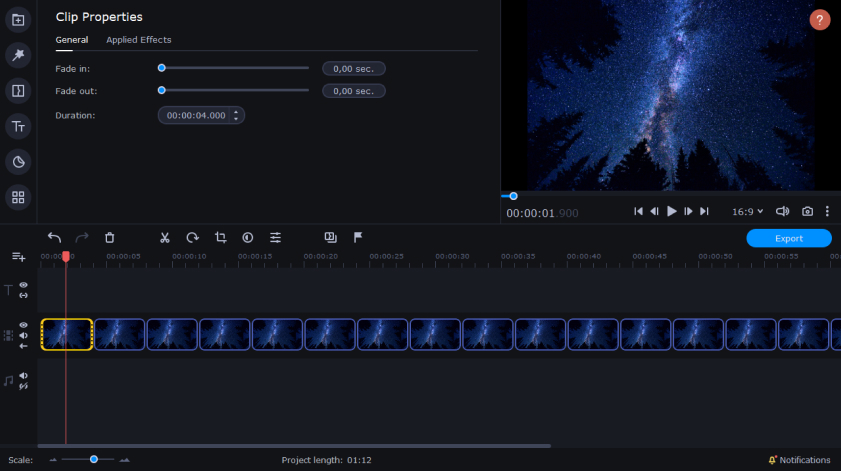
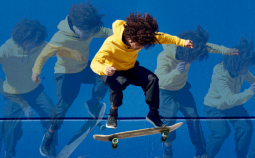
Simply put, a “time-lapse” is capturing anywhere from a few all the way to thousands of individual photographs, stringing them into a sequence, and playing them back. When you look at the photos themselves, you see a singular moment. But once you play back that sequence, motion emerges. When you hear the words “time-lapse” or “video lapse,” a few images may come to mind: a road trip across the States; a starry night sky passing by in a national park; a flower bud springing to life; a skyscraper magically building itself in a matter of minutes. All of these examples are what we think of as time-lapses today, but that’s not how they started. In fact, the very first time-lapse was quite humble.
Photographer Eadweard Muybridge made history by doing something radical 150 years ago. He asked a simple question: how can I capture motion through photography? Instead of taking one photo of something, why not capture many and put them together in a sequence? In the 1870s, Eadweard set up 24 cameras with rigs to capture one thing: a horse galloping by. Each frame was printed on a card, which felt like normal photography. However, once someone put those cards together in a sequence, those still photos transformed into motion. Creating a time-lapse shot is substantially easier than it was 150 years ago, but the foundation remains the same. With enough imagination, you can make any frozen moment spring to life.
With the advent of video, the definition of “time-lapse” expanded. In this article, we want to distinguish between “time-lapse” and “video lapse.” As we mentioned earlier, a time-lapse is capturing dozens of photos of a moment, stringing them together, and playing them back. This creates the illusion of motion (think of Eadweard’s galloping horse).
In contrast, a video time-lapse (or video lapse) doesn’t involve taking any photos. Instead, think of it this way: let’s say you want to create a time-lapse of a skyscraper being built, but you don’t want to use photos. You’d rather use video. Here’s how you do it: record a video for at least ten minutes of the construction site. Review the footage, and it feels like a normal video. However, once you speed up the video 20-100x, the skyscraper starts building itself before your eyes… and you didn’t take a single photograph. That’s the difference between a picture time-lapse and a video time-lapse.
With all that said, you might be wondering: why even make a time-lapse? Here’s why: there’s no better way to capture the passing of time. If you want to capture the beauty of a flower blooming, no photo or video will do it justice. Instead, a time-lapse allows you to watch that magical moment without waiting around or only capturing one frame of it. Or, if you want to see the stars move across the sky without standing outside all night, shooting a time-lapse video is the perfect solution. Ultimately, whether you’re interested in making time-lapse videos comes down to one question: do you want to capture beauty and wonder?
Before you venture off to make a time-lapse of your own, there are a few things you should know. Anyone can make a time-lapse video by jumping into it, but you’re reading this article because you want to do it right. Here are some important considerations before you turn photos into a time-lapse video:
No matter how many batteries you think you need, charge them the night before. When you’re recording videos or photos in bulk, you can never be too careful about your battery life. In fact, before you embark on your adventure, we highly recommend you also pack extra batteries. You don’t want to risk your camera dying right as the flower is blooming or the Aurora Borealis starts to show itself.
Autofocus is great when you’re in run ‘n gun mode, but when you’re getting a time-lapse shot, you need to manually focus your shot. Why? If your shot loses focus in the middle of the time-lapse, it’ll take the viewer right out of the scene. It takes some extra time, but it’s always worth it.
Like focus, we highly recommend setting exposure manually before every shot. This may take more time, but think of it this way: if you rely on auto exposure for your time-lapse and some storm clouds roll in, your camera may not adjust properly. Suddenly, your time-lapse is thrust into darkness… and the viewer is thrust right out of the magic. Every time-lapse should be a smooth experience, so take the time to do it right.
If you’re shooting a video time-lapse, you’re going to need space – a lot of it. 1 hour of full HD (1080p) video sits around 2.2 GB, and 1 hour of 4K (2160p) video sits at about 5 GB. Meaning, a mere 10 minutes of HD video footage will demand about 300 MB (or 700 MB for 4K) of memory. So, plan accordingly and bring plenty of backup – you wouldn’t want memory cards to ruin your next best creation.
Now that you know the history of time-lapse, why you should shoot one, and powerful tips to get you started, you’re probably wondering how you’ll transform that raw footage into the magical time-lapse you’re imagining. That’s where video editors come in. However, when it comes to doing it right with time-lapses (whether photo or video), a bare-bones editor won’t cut it.
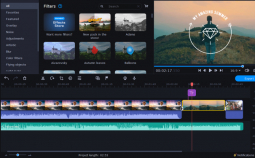
If you’re ready to make the time-lapses of your dreams, you need a video-editing suite that gives you all the power, features, and flexibility that the pros use. That’s where Movavi Video Editor comes in, which is the last video editor you’ll ever need.
Movavi Video Editor is a non-linear video editor and producer that knows how to transform your footage into magic. Compared to other programs out there, there are a few key things that Movavi Video Editor does that others just can’t.
If you’ve ever felt like other video editors require a textbook to understand, Movavi Video Editor is your solution. Our goal was to make an interface so intuitive and fun to use that anyone can start making movies within an hour of starting. This is the best way to get started fast and produce your first time-lapse even faster.
Like we mentioned earlier, processing a time-lapse takes a lot of power. Movavi Video Editor is designed to handle what the pros throw at it, so you’ll never have to worry about slow buffer times or low quality videos.
When you’re ready to share your latest time-lapse, why add extra steps? With Movavi Video Editor, you can easily share your time-lapse with just a few clicks – no extra uploading. You put a ton of effort into that time-lapse shot, so show it off.
Now that you know the fundamentals and have your tools, we’re ready to show you how to make your time-lapse masterpiece. The next section is divided into two parts: first, we’re going to show you how to create a time-lapse video from photos, breaking it down from start to finish. Then in part 2, we’ll walk you through how to create video lapses, breaking down the secrets to shooting a time-lapse video, what the ideal video length is, and so much more.
The first method is to create a time-lapse video from photos. Creating your first time-lapse may feel daunting at first, but once you break the process down, it’s surprisingly simple. In this tutorial, we’ll share each step of the process, along with some helpful tips to get you time lapsing in no time.
Before you can create time-lapse magic, you first have to decide a few things. For one, what are you recording? What time of day? How much time do you want to capture? Two, set your settings. Exposure, focus, the whole nine yards. You want your time-lapse to stand out, so don’t skimp on the basics. Set yourself up for success.
Make sure you’ve got Movavi Video Editor ready to rock. Once you do, click the Add files button and select all photos involved in your time-lapse. Those photos will promptly appear in the Project files, which you can then transfer to the timeline to start making your time-lapse video.
Here’s the part you’ve all been waiting for. Since your images are already in sequential order, simply select all photos and drag them onto the timeline. To make the smoothest time-lapse possible, we recommend clicking Clip properties (located above the timeline) and setting the frame duration to 00:00:00.010.
This step is optional but highly encouraged. Why? Because adding music to your time-lapse improves the experience for the audience. To add audio, follow the same steps you used to add photos. Place the audio underneath your photos and trim it (using Ctrl + B or Command + B) to match the length of your time-lapse.
Once your time-lapse feels good, click Export and select your settings. With dozens of file formats and settings to choose from, you can be certain your time-lapse will go wherever you go. Plus, you can share your time-lapse directly to YouTube, Vimeo, Google Drive, and TikTok.
The other way to create a time-lapse is through sped up video. Why? Because video automatically gives you smooth and crisp footage to use – all you have to do is speed it up. The steps are pretty similar, but we’ll lay them out anyway to keep you on track.
For a video time-lapse shot, establishing your shot is pretty similar to a photo time-lapse shot. Consider the time of day, your subject(s), and how you want to record. You’ll want to record for at least 5 minutes to have plenty of footage to transform into a time-lapse.
Download and install the program on your PC or Mac. After the installation is complete, launch Movavi Video Editor. Click the Add files button and select your video clip. Once your video is in the Project files, transfer it to the timeline.
For a video time-lapse, the most important feature to worry about is the video’s speed. Click Clip properties and drag the Speed slider to change the video speed. Adjust the speed to at least 500% the original speed. Anything less won’t create the smooth effect you’re looking for.
Like for photo time-lapses, a song can elevate your time-lapse video. To add audio, follow the same steps you used to add your video. Place the audio underneath your video and trim it using Ctrl + B or Command + B.
To save your video, click the Export button and select your saving settings. You can select the output folder and file format for your time-lapse video. If you want to share your video, open the Upload online tab to directly upload it to YouTube, Vimeo, Google Drive, or TikTok. Your video time-lapse is ready to see the world.
No matter how you create your time-lapse videos, the result is the same: a captivating, mesmerizing video that beautifully captures the passage of time. Whether you’re showing a flower bloom or a skyline come to life, your time-lapse is only limited by your imagination. Once you understand how to do it correctly, the possibilities of what you can create are endless.
In order to make your time-lapse vision come to life, you need a video editor that can keep up with your creativity. That’s where Movavi Video Editor comes in. Equipped with the easiest interface to learn in the industry, professional-grade processing, and direct connection to your favorite social media sites, Movavi Video Editor is the last video editor you’ll ever need.